HTML/JavaScript

Friday, December 31, 2010

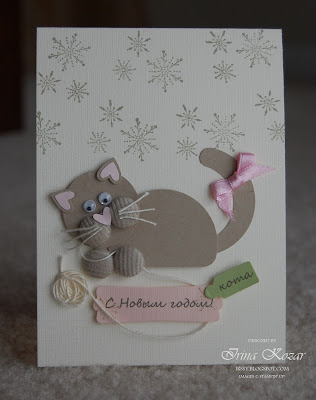
Year of The Cat

I haven’t made anything using my Two-Step Owl Punch for a while, so here is my tribute to all those who love the paper punch art:
* * *
Я знаю, что некоторые из моих читателей особенно любят совиный дырокол от StampinUp!, который я уже давненько не использовала в моих работах. Данная открытка дань любителям дырокольного искусства:

To make the cat, I used the 1-3/4’’ Circle Extra-Large Punch from Stampin’ Up! (body and tail), 1-1/4’’ Circle Extra-Large Punch from Stampin' Up! (head and tail), Two-Step Owl Punch from Stampin’ Up! (pink ears and nose), Heart to Heart Punch from Stampin’ Up! (ears), Crumb Cake Corduroy Buttons from Stampin’ Up!, googly eyes.

This card is currently participating in Christmas/New Year Challenge from the blog ScrapIdeas.
* * *
Для котенка я использовала  1-3/4’’ круглый дырoкол от StampinUp! (тело и хвост), 1-1/4’’ круглый дырокол от  Stampin’ Up! (голова и хвост), дырокол «Сова» от StampinUp! (розовые ушки и носик), дырокол “От сердца к сердцу» от StampinUp! (ушки), пуговички от  StampinUp!, движущиеся пластмассовые глазки.
Данная открытка принимает участие в новогодне-рождественском задании от блога СкрапИдеи.


Мягкой поступью кошачьей
К нам приходит Новый год...
Счастья, радости, удачи,
Сытой жизни без хлопот!
Чтобы денежка - в кармане
И в делах сплошной ажур,
Хвост в тепле, усы в сметане,
А на сердце - "мур-мур-мур"!
Happy New Year!

Tuesday, December 28, 2010

Monday, December 27, 2010

Button Christmas Tree and Earrings


I made this card for the challenge "A New Life for Old Buttons" from the blog My-Scrap.Ru. To make the Christmas tree, I used all the old buttons that I had in my stash and a couple of new ones, from Stampin' Up!. The little button brads are also from Stampin' Up!.

I will also submit this card for the following challenges:
- "A Christmas Tree" from the blog Sunhouse
- "Christmas/New Year" from the blog ScrapIdeas.

 * * *
Эту открытку сделала по заданию «Новая жизнь старым пуговицам» от блога My-Scrap.Ru. Для елочки использовала какие были у меня в наличии старые пуговицы, а также пару новых от StampinUp!. Пуговки-брадс тоже от StampinUp!.
С этой же открыткой поучаствую в задании "Елочка" от Скрапстудии "Sunhouse", а также в "Новогодне-рождественском" задании от блога СкрапИдеи.

In addition to the card, I also made a pair of earrings, where I used a couple of old buttons as well as flower buttons from Stampin' Up!.
* * *
В дополнение к открытке сделала еще пару сережек, где использовала пару одинаковых старых пуговиц и пуговки-цветочки от StampinUp!.

New Year Birthday


I made this card using the sketch from Mojo Monday:
* * *
Открытку сделала по скетчу от блога Mojo Monday:


This card is also participating in the associative challenge “The Holidays are Coming” from the blog Творческая мастерская”. My association with January 1 is not only the celebration of a New Year, but also my best friend’s mom’s birthday. And this card is for her.
* * *
“Также данная открытка принимает участие в ассоциативном задании «Праздник к нам приходит» от блога “Творческая мастерская": у меня 1-ое января ассоциируется не только с празднованием Нового года, но и с днем рождения мамы моей очень близкой подружки. Эта открытка для нее.


Saturday, December 25, 2010

Jingle Bells


Merry Christmas, everybody!
I hope you all got what you wanted from Santa. I surely did! My Santa was very nice and generous, and brought me a nice Stampin Up! present: 5 different ribbons, 4 stamp sets, 3 different paper punches, paper, ink pads,  trinkets, rub-ons...what a wonderful Christmas! Thank you, Santa!
* * *
С Рождеством вас, друзья!
Надеюсь, что каждый из вас получил от Санты в подарок все, что вы хотели. А если вас Санта или Дед Мороз еще не посетили, то надеюсь, что в Новогоднюю ночь он принесет вам тот подарок, о котором вы мечтали. Мой Санта был поистине добр и щедр и принес мне на Рождество замечательный подарок от Stampin' Up!: 5 разных лент, 4 набора штампов, 3 дырокола, бумажку, чернила, натирочки...какое замечательное Рождество! Спасибо, Санта!

Note: Данная открытка принимает участие в "Новогодне-рождественском" задании от блога СкрапИдеи.

Friday, December 24, 2010

Santa Baby


Finally, I made something for my husband. I wanted my card to be a little bit naughty, a little bit playful:) To make it, I used a blank sound card that I got from Stampin’ Up!. "Santa Baby" is the song I recorded inside.
To make this card, I used the sketch from Create4Fun, but after playing with it too much,  it's hardly recognizable now. Also, used the colors (red, green, gold) from the Russian challenge blog Скрап без границ.
* * *
Наконец-то я сделала что-то и для своего мужа. Мне хотелось сделать шаловливую открыточку, поэтому использовала рождественский ретро пинап. Кроме этого, эта открыточка музыкальная. StampinUp! продает пустые открытки, готовые к записи, а также с записью песни “We Wish You a Merry Christmas”. Я выбрала пустую, которую оформила вот таким образом, а внутри записала песню “Santa Baby”. Мне кажется, она больше подходит для моей шаловливой девушки:) Смысл в песне таков, что она ласково просит у своего "Санты" в подарок новенький кабриолет, яхту, квартиру и т.д.
Использовала скетч от Create4Fun, но в процессе работы так увлеклась, что теперь скетч в моей открытке трудно узноваемый. Кроме того, воспользовалась палитрой (красный, зеленый, золотой) от блога "Скрап без границ".


Thursday, December 23, 2010

Perfect Pair


Yesterday, you saw a cake from me, today – underwear, who knows what is coming tomorrow:)...
This card is a gift (or I should say - a part of a gift) for my mom and step-father's 20th anniversary.
Happy 20th anniversary, guys!
* * *
Вчера были торты, сегодня – трусы...куда меня завтра потянет - остается только гадать:)
Эту открытку я сделала в подарок маме и Саше, ее гражданскому мужу, на 20ти-летие их совместной жизни.
С вашим 20-летием, дорогие!

Wednesday, December 22, 2010

Monday, December 20, 2010

A Fire Truck for Arseny


My friend in Estonia has a son whose name is Arseny, and he just celebrated his 4th birthday. And when I had to think what card to make for him, it didn’t take me to long to figure it out. Arseny – arson – A FIRE TRUCK!
The text I wrote inside in Russian could be translated as this:
Happy 4th birthday, Arseny! “Arson” in English means that somebody set a fire, and we hope your Birthday party is FIRE, but not in real flames!
But just in case – here’s a fire truck for you!
* * *
Эту открытку я сделала для мальчика Арсюши, сына моей очень близкой подружки из Эстонии. Ему недавно исполнилось 4 года, и когда я села делать ему открытку, мне не пришлось долго ломать голову. Ответ нашел сам себя: “arson” по-английски означает “поджог”.  А раз поджог, значит, нужна пожарная машина!
Текст внутри открытки был следующим:
Дорогой Арсюша!
Поздравляем тебя с твоим 4-ым Днем рождения!  “Аrson” по-английски означает “поджог” , но мы тебе желаем не поджигательного, а зажигательного Дня рождения!
Но на всякий случай – вот тебе полицейская (это был подарок) и пожарная машина!

Sunday, December 19, 2010

Unicorn Card

My 5-year-old niece’s dream is to get this unicorn pillow pet:

So, we got her one for Christmas, and when I sat down to make a card for her, I thought – well, I just must make a unicorn card!
A quick search online and I found this beautiful image:
Note: The website where I found this beautiful image doesn't exist any more, but if you know its author or the original source, please let me know. I would really appreciate that and be happy to provide the direct link to it. Thank you!

Using the image above and sketch #197 from CardPositioningSystem, I created this card:


Friday, December 17, 2010

Orange Christmas


To make this card, I used sketch #94 from Card Patterns:

Challenges:


Embellish Scrapbook Layouts Color Challenge


Recently, I’ve discovered a simple but wonderful technique for scrapbook backgrounds, the bubble wrap technique (that I found here), and I’ve been waiting for a chance to implement it in practice.  And the latest Embellish challenge seemed to be perfect for that:

So to make the polka dot background, I took a piece of bubble wrap, covered it in ink (use an ink pad or re-inker), and tapped it onto the cardstock. It’s the simplest, cheapest, and greatest technique ever. Love it.

And by adding the square layout, I tried to recreate the mosaic effect that you get looking at the lobby sign in the Embellish poster.

Tuesday, December 14, 2010

Decorating for Christmas. Part II.


The photo Christmas tree ornaments that you see above are very easy to make and very inexpensive (compare to those that you can buy online)! Here are step-by-step instructions how to make them:
1.  Decide on a shape of your ornament (I personally like them as ovals and make them in two different sizes: small and large);

2.  Make a template;

3.  Print out 2 copies of the same photograph in sepia (use photo paper for that);

4.  Cut the photos into a desired shape using a punch or your own template, then glue the blank sides together to make it double-sided;

5.  Add some ribbon and a bow and it’s done!

And I have a tradition of adding a few new ornaments each year, and they usually portray some of my family's happiest or most important moments of the past year.
* * *
Елочные фото-украшения на фото сверху очень просты в изготовлении и по стоимости выходят абсолютно недорогими (по сравнению с теми, которые продаются готовыми онлайн). Вот пошаговая инструкция, как их сделать самим:
1.  Выбирите, какой формы будет ваше фото-украшение (я их делаю овальными двух размеров: большого и маленького);

2.  Сделайте шаблон;

3.  Распечатайте 2 копии одной и той же фотографии в цвете сепия (используйте фотобумагу);

4.  Вырежьте фотографии желаемой формы, используя для этого дыракол или приготовленный Вами шаблон. Затем склейте пустые стороны изображений вместе, чтобы получилось двустороннее фото.

5.  Добавьте ленточку и бантик, и готово!

Кроме того, у меня уже традиция – добавлять каждый год несколько новых украшений, которые обычно отображают самые счастливые или важные моменты уходящего года в нашей семье.